Thanksgiving isn’t complete without a variety of pies. Forget the usual pumpkin or pecan—let’s explore the quirky world of desperation pies. These pies, born in the mid-20th century, use simple, cheap ingredients.
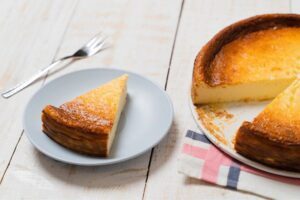
One standout is buttermilk pie, a Southern favorite. It’s like chess pie but with buttermilk and wheat flour. The result? A tangy, lemony delight in a flaky crust.
However, making it at home can be tricky. We’ve been there, battling custard pie woes.
Below, we’ll share our past pie-making challenges and provide tips on how to bake the perfect buttermilk pie, so let’s dive right in!
Buttermilk Pie Mistakes and How to Avoid Them
Check out our tips for mastering this Southern classic and serving up a bakery-worthy buttermilk pie at your holiday feast!
Greasy Crust
Nail the perfect pie crust by keeping your butter as cold as possible. Butter has both fat and water. As your pie bakes, that water transforms into steam, creating that coveted flaky crust.
Leaving your butter warm up or melt sabotages this process, leaving you with a lackluster, greasy crust.
The good news? Plenty of tricks ensure your pie crust hits the right notes. The key is keeping your butter as cold as possible.
Dice it up and toss it back into the fridge until you’re ready to work your crust magic. Another cool move? Grate frozen butter directly into the mix. It’s all about keeping things frosty for that dreamy pie texture.
Cold Ingredients Can Ruin Your Recipe
When whipping up a buttermilk pie sans butter in the crust, bring your filling ingredients to room temperature before baking.
Why? Buttermilk pie craves a smooth blend of elements, especially because of the particular filling. Soften that butter with flour and sugar for easy whipping.
Room-temperature eggs will help you achieve better results—cold eggs can stiffen the butter, leading to overmixing, while room-temperature eggs result in a flawless, smooth consistency.
Avoid Adding a Top Crust
In the world of buttermilk pies (and custard pies in general), top crusts aren’t a good idea. Why? The top layer messes with crust moisture.
There is no juicy fruit filling here that needs containment like in fruit pies. If you’re a crust enthusiast, don’t fret.
Get creative without sealing in moisture—try crust cutouts or pre-baked lattice strips added post-cooling. It might break tradition, but the crust lovers among us will appreciate the unconventional touch.
And if you accidentally go bottom-only with the crust, tweak the recipe accordingly. Forgot? No worries—get imaginative with leftover pie crust.
Double-Chill Your Pie Dough
Have you ever faced a dense or shrinking pie crust? The culprit might be overworked dough or melted butter causing gluten formation—the protein giving the dough structure.
Too much gluten? Stodgy, tough crust. Too little? Fragile crust during baking.
Solution: double-chill your dough. First, chill it after forming a ball to let the gluten relax and butter solidify.
Second, chill after rolling it out and fitting it into your pie dish. Bake the cold crust straight from the fridge to the oven for a fail-proof crust.
Avoid Overwhipping Your Filling
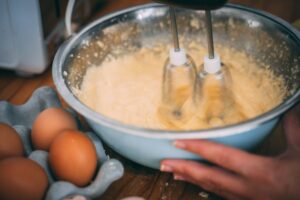
Custard pies, including buttermilk, suffer from a common pitfall: overwhipped fillings. The mantra here is “gentle, yet assertive.”
Overwhipping can lead to scrambling and splitting. Pay attention to the order, too. Most buttermilk pie recipes start with a blend of butter, eggs, and flour before introducing buttermilk and lemon juice.
Why? Acidic elements can curdle eggs prematurely. Mix your acids in just enough to blend smoothly without surfacing egg chunks. Balance is the key to a perfect filling.
Don’t Omit the Flour
Flour plays a crucial role in distinguishing buttermilk pie from chess pie. While chess pie relies on cornmeal for a thick, subtly chewy texture, buttermilk pie opts for flour as a thickener.
Without it, you’d miss out on the lush, thick texture that defines buttermilk pie, and your custard filling might struggle to set.
Use a couple of tablespoons of flour for that perfect texture. Ensure thorough mixing to prevent flour clumps, guaranteeing a well-dispersed consistency.
For precision, weigh your dry ingredients on a scale to avoid ending up with a clumpy filling.
Avoid Letting the Filling Sit for Too Long
Baking involves juggling multiple tasks, especially during special occasions like Thanksgiving. But don’t play the waiting game with buttermilk pie filling.
The egg and sugar base makes it prone to scrambling if left on the countertop.
Sugar’s hygroscopic nature pulls water from surrounding ingredients, including eggs, resulting in bits of scrambled egg in your otherwise smooth custard.
This process takes around 20 minutes, so don’t stress over a few minutes. Start on your custard filling while the crust is par-baking to sync up timelines and sidestep the scrambled egg scenario. Balance is key in the art of baking!
Protect Your Pie from Rapid Changes in Temperature
Custard pies, like buttermilk pie, are temperature-sensitive. The cooling process varies—some leave pies in the oven with the door ajar, while others swiftly remove them.
To avoid overcooking, deduct around ten minutes from your baking time.
Also, keep the oven temperature in check; for our blackberry-buttermilk pie, 350°F is the sweet spot. High temperatures risk egg splitting, so stick to a low-and-slow cooking approach for your buttermilk pie.

Use Fresh Buttermilk for the Filling Rather Than a Substitute
Buttermilk is the star of buttermilk pie, providing its tangy flavor and unique texture. No substitutes allowed! DIY versions with milk and acid won’t cut it; their texture doesn’t blend well in the filling.
Opt for high-fat buttermilk labeled as “whole buttermilk” for the ideal texture. While low-fat buttermilk is an option, it won’t deliver the same creamy consistency.
Par-Bake Your Crust to Prevent a Soggy Bottom
Essential for buttermilk pie perfection, par-baking your crust ensures it crisps up before the wet filling takes over. Distinct from blind-baking (for pies with unbaked fillings), par-baking is ideal for custard pies like buttermilk.
Use pie weights or beans to weigh down the crust. Minimize the risk of scrambling by briefly cooling the crust before introducing the filling, avoiding the clash of hot crust and cold filling.
Use a Pie Shield if Your Crust Browns Too Fast
Par-baking provides a head start but may lead to a fast-browning crust. Protect it from burning with a homemade pie shield. Crafted from aluminum foil, fold it into a smaller square and cut it into a circular shape.
Ensure three inches of space on the rim for proper coverage. When the edges darken, crimp the shield over the pie. Alternatively, place the cover when pouring in the filling to avoid navigating foil around a hot pie plate.
Chill Your Pie After Baking to Allow it to Set
Post-baking patience is key. Custard pies, including buttermilk, need time to set. The two hours on the countertop post-bake allow the custard’s proteins to firm up.
Slicing prematurely risks a pie slump and a soggy crust, a disappointment after your baking efforts. Let it cool and set, and you’ll savor the rewards of your meticulously crafted buttermilk pie.
Conclusion
Navigating the challenges of buttermilk pie demands attention to detail and a careful approach.
From managing ingredients to perfecting baking techniques, overcoming these hurdles ensures a flawless and delightful buttermilk pie every time.